5 steps in creating painting
There is a process of making for every product we see. It is the same with paintings: you have an idea, then you make sketch, transferring it on canvas, take your brushes and paint. It might be not good in the beginning, but for sure it will be better with time. And as in any other thing, the more you practice, the better it will be.
“Little Joseph” is one of my paintings that are very dear to me. My 4 years old son have those tiny shoes, size 22, in vivid colors. He left them on the balcony, on some red fruit crate. I was drinking my first coffee when the sun shined upon them. It was amazing how beautiful they were! The colors, the shadows and the way they were laid on the crate – it was perfect composition. I was reminded of a Bible story of Joseph, who received a cloth of many colors as a gift from his father. That is where the title “Little Joseph” came from. I had to paint them.
Here is the whole process in 5 steps in creating painting.
Step 1: Drawing
This is how I start. In the beginning, I was making just a simple sketch of something I wanted to paint, but than I was often tempted to improvise. Now I tend more to have a precise drawing, like this on the photo below. Than I transfer the drawing on canvas, using graphite paper, which saves time.
Step 2: Blocking in
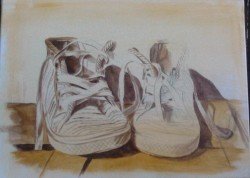
After I make the sketch on canvas, I continue with blocking in (painting areas that are in shadow) , using only Burnt Umber and Raw Sienna. This process helps me to see the depth on the canvas and in the same time, emphasize light areas.
Step 3: Adding color
I paint with acrylics and I paint in layers. Here is the first layer. It is very thin. This helps me to see how certain colors will fit on canvas and if I don’t like any, I can easily cover them with other color later.
Step 4: Adding layers
Once I know the exact colors, I apply thin layers of paint upon them. When the paint is on the canvas, it becomes more transparent, so as the light goes through the layers, it gives the depth on the painting at the end.
Step 5: Finished painting
The painting is basically done in Step 4. In this last step, I just check the details or adding color here and there (usually white at this point) if I want to emphasize some detail. But, this is the hardest step for me, because at some point I have to say: “Now it’s finished”, and I am always tempted to add one more brush-stroke 🙂
Here is the final painting. I hope you enjoyed.


Good Morning Toni, I am teaching the Sunday school lesson to teenagers in my congregation and they all wanted to do something with their hands in conjunction with the lesson. As an artist I agreed to take them through the steps of creating a painting over the next few weeks. Your site was perfect!! I am using the steps you provided along with scriptures to apply to their personal walk with GOD. Drawing-Plans, how GOD always has a plan (for each of us), Blocking in-I compared this to two things, searching for him and growing deeper in his word (blocking in his word in their hearts), Adding Color-Enhancing their relationship with the Father, Adding layers-Various levels of service to GOD and People, Finished Painting – People being able to identify them as people of GOD, their will always be room for spiritual growth, but at some point, people will be able to distinctly identify true servants of our Father. I just wanted to share with you how beautiful your work is and how its is being used to build up others! Blessings, Adrienne